
Introduction
Components are the smallest units yet the most common use case in Angular. So far we have learned how to write unit tests in Angular by covering some basic concepts, Jasmine matchers, and working with Spies. In this tutorial, we will apply what we’ve learned so far, and demonstrate how you can write unit tests with Angular Components.
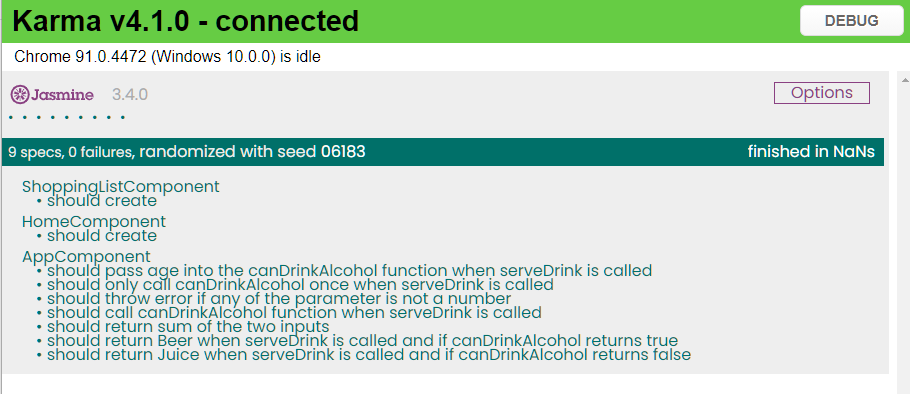
For this tutorial, we have prepared a simple shopping cart application:
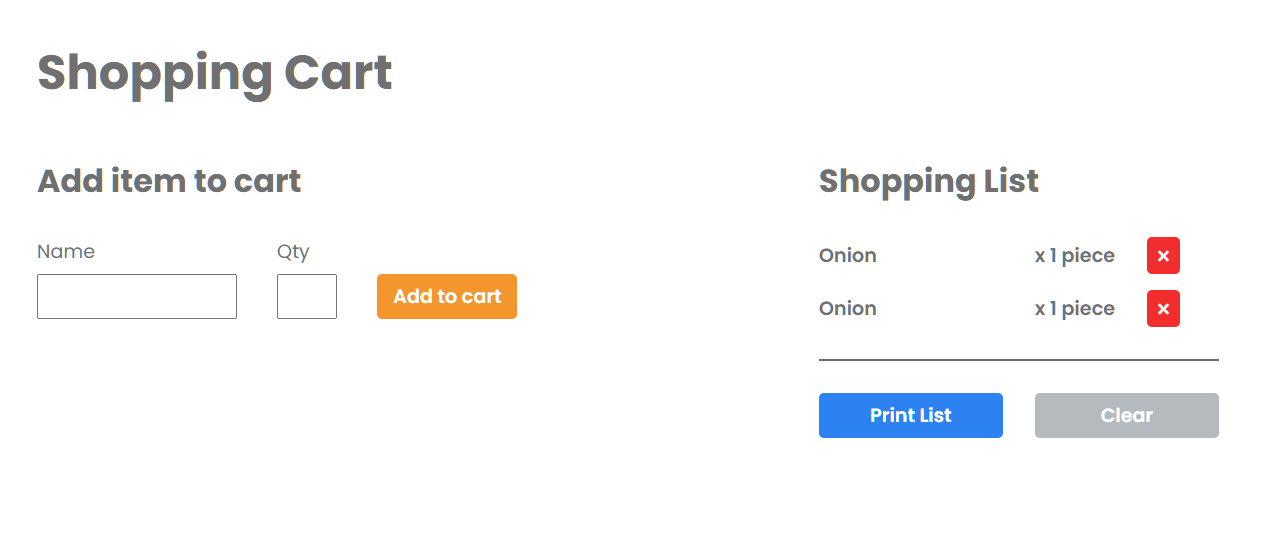
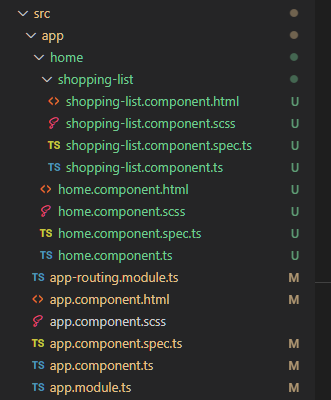
This application consists of two components, which we will write unit tests against – the HomeComponent and the ShoppingListComponent.
Prepare the TestBed
When you start the test by running the ng test command, you’ll notice that even without writing any tests for these two components, there are already many errors on the output browser.
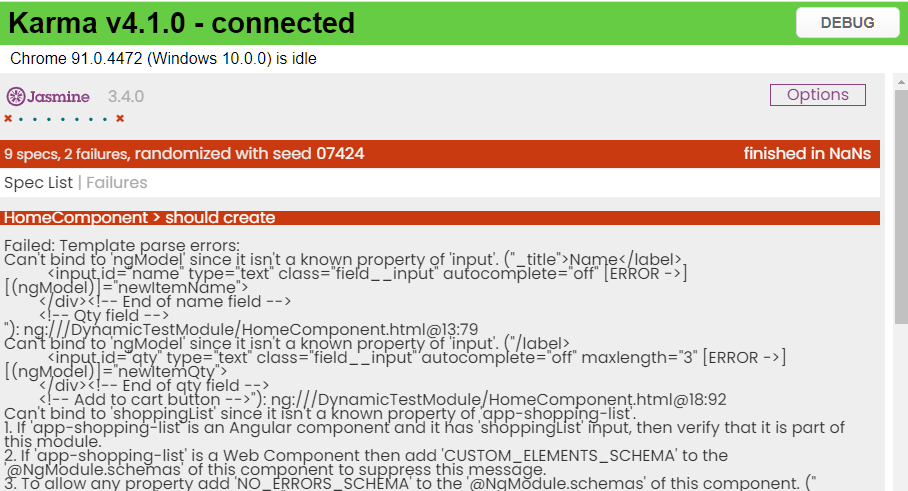
This is because we have not yet set up our TestBed. As mentioned in the first tutorial, in the Angular test environment, we must explicitly define any modules, services, or child components that we need in the TestBed. In the console, the directive ngModel is not recognized because we haven’t imported the FormsModule yet.
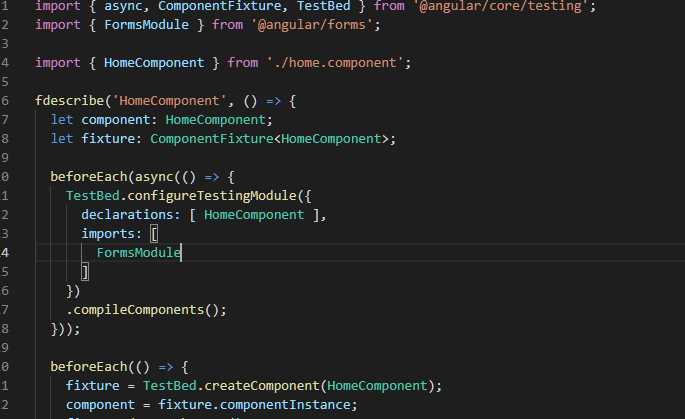
We can easily import FormsModule into our TestBed by adding an imports array in the TestBed configuration section.
After we import the FormsModule and save again, we will see the ngModel error has been resolved, and now there’s a new error.
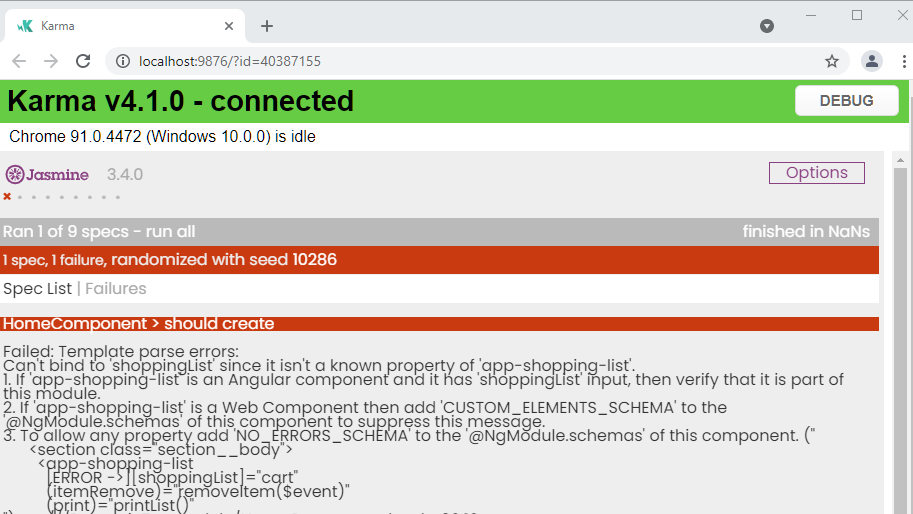
This time, Angular complains it doesn’t recognize our shipping-list component directive. To fix this issue, we need to declare this component in our TestBed.
While you could declare the real component in the declarations array, it is recommended to create a mock class component instead, so that we can keep the mock component as simple as possible.
Let’s define a mock shopping list component:
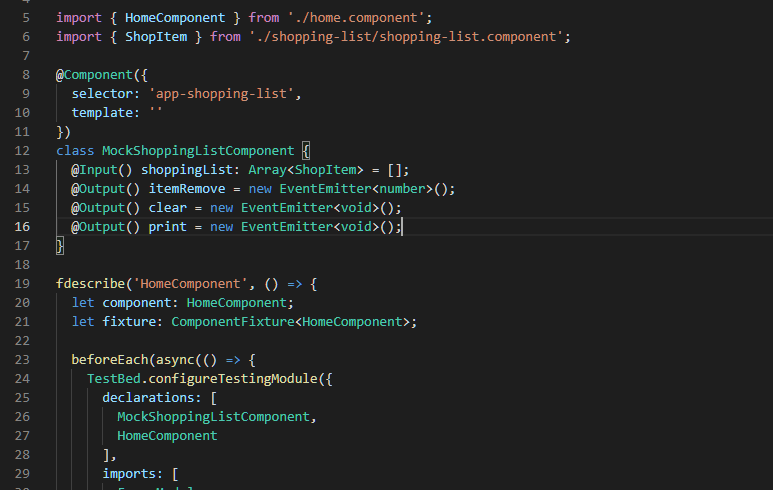
You may declare a mock component directly before your TestSuite. As you can see from the image above, in our mock component, we make the component template empty just to make it simple. What’s really important is that you need to keep the selector consistent with the actual component, so that Angular will know you are referring to this component in your HTML during tests. In addition, if your child component consists of any Input or Output declarations, you must also include them in your mock component class, so that you may refer to them in your parent component.
After the fix, we’ll see a successful output from the screen.
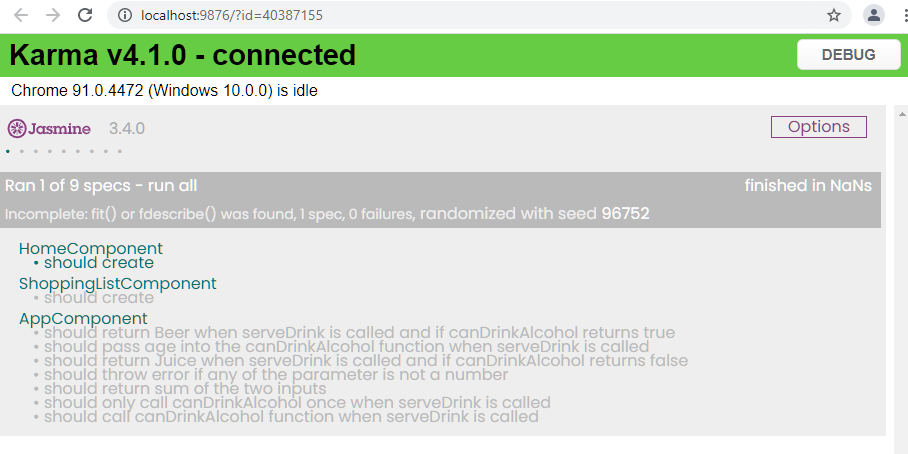
Now let’s fix the TestBed for the ShoppingListComponent as well.
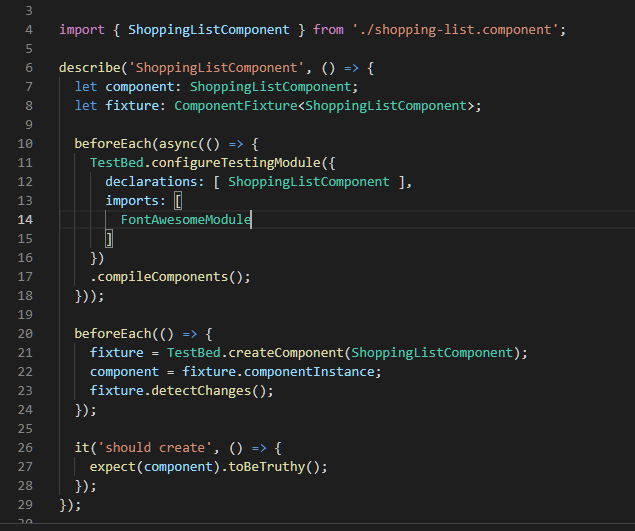
After importing the FontAwesomeModule, we now see a successful screen for us to begin working on unit tests.
What to test in Angular Components?
In a component testing in Angular, there are three main aspects that you would want to cover in your tests:
- HTML
In HTML related tests, you want to test if the HTML is organized or written in the way you expected. The purpose of this kind of test is to keep you informed if someday you or other developers change the HTML in a way that differents from how the component was originally designed - TypeScript
TypeScript is where the main logic lies in our component and is therefore what most of your unit tests will be about. Usually when writing tests for the component.ts file, you want to test if each function has correct input/output and if they are executed in the correct order (For instance, if function B will be called when function A is executed, etc…). - Relationship between TypeScript and HTML
This kind of unit test mainly tests if the HTML is rendered correctly when certain variables in the TypeScript are updated. Some people would consider this kind of test as an integration test, however, I’d like to consider it as part of a component unit test.. As both HTML and TypeScript must function correctly in order for a component to be considered working properly.
HTML Tests
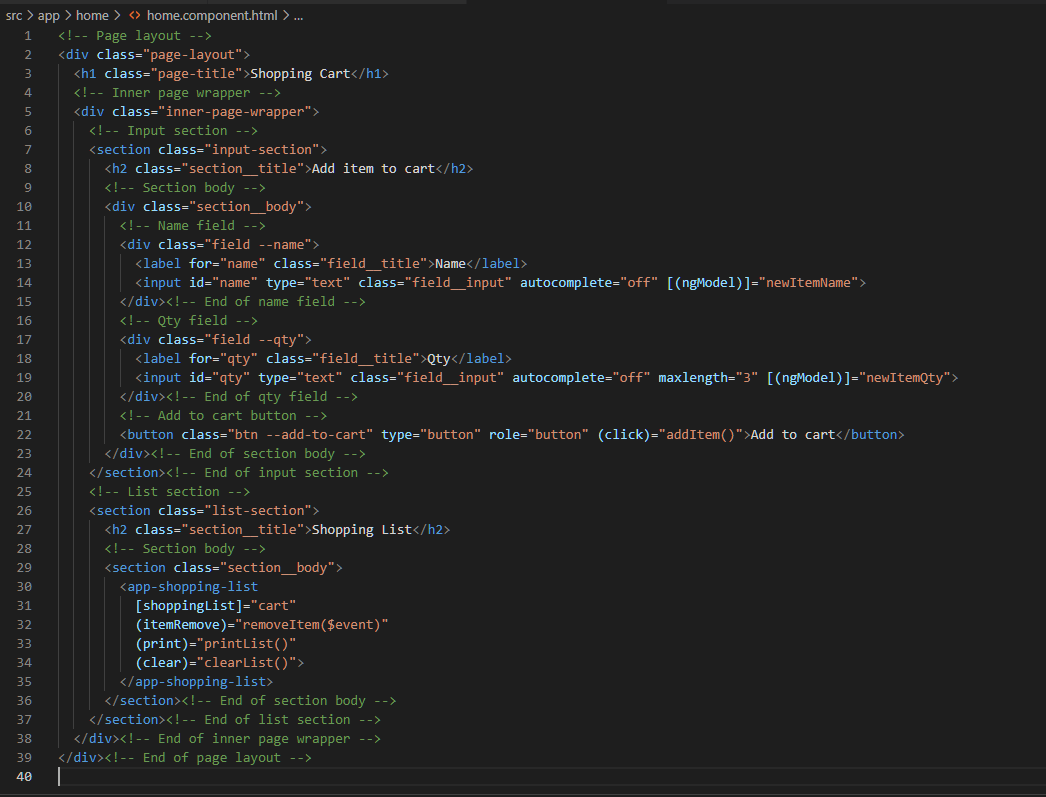
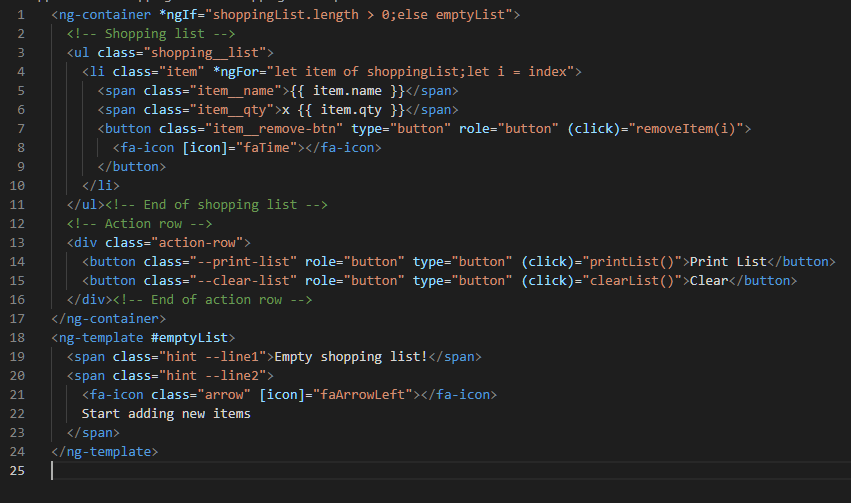
Before we write tests against the HTML, let’s look at our HTML file.
Test if DOM elements exist
While there aren’t many lines of code in the HTML, it’s quite bizarre if you test them line by line and may easily get lost. An easy approach would be to go through them layer by layer starting from the first two layers on the outside.
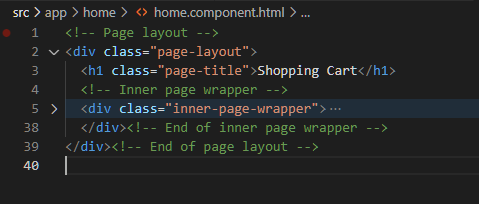
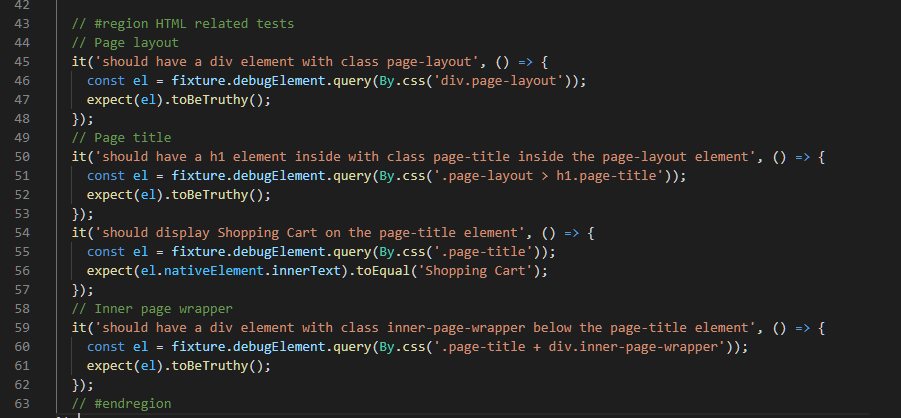
For these two layers, we want to test if there’s indeed a div element with the CSS class page-layout, and inside the page-layout element, there is a h1 element and a div element with the class inner-page-wrapper.
For the complete test, please find it on GitHub.
To test if a HTML element exists on the DOM, we use the query function from the fixture.debugElement.
Inside the query function, there are a couple options you may choose from:
- By.css
This approach allows you to access DOM elements with CSS Selectors. This is a very powerful function as you can pretty much select any element on the DOM using CSS Selectors. The syntax will be the same as if you’re using document.querySelector. - By.directive
This approach is more suitable if you are targeting a specific type of DOM element on the HTML. You can pass the element type. For instance, if you are using Angular Material Button, and you want to test if there are MatButton on the DOM. You could query them like this:
const el = fixture.debugElement.query(By.directive(MatButton));Note. If you want to select multiple elements at once, use queryAll instead of query. Also, when you import By function, make sure you import from @angular/platform-browser. The protractor instance is for Angular End to End Testing only.
Test DOM element attribute
Sometimes we would like to test if a DOM element indeed has the attribute we expected. In this case you can first query the element then call the getAttribute function from the nativeElement.

Test DOM element displayed text
To test the text displayed in a DOM element (span, h2 elements for instance), you may access them from the innerText property.

Test DOM element CSS class
DOM element CSS class can be tested through the nativeElement.classList property. The classList property will return an array that consists of all classes on the DOM element. To test if a class exists in the classList array, we can use the toContain matcher from Jasmine.

Trigger DOM element events
If you need to trigger DOM element events during unit tests, there are a couple ways you can do this.

- triggerEventHandler
You can trigger the event by calling the triggerEventHandler function directly on the debugElement returned by the query function. - dispatchEvent
You may also use the native dispatchEvent. However, since this is a native DOM method, you will need to access it from the nativeElement instead of calling it from the debugElement directly. - Native element method
Some DOM elements have their own method that you can invoke directly. In order to call their native methods, you will need to first convert the nativeElement into the corresponding DOM element.
TypeScript Tests
Let’s take a look at the TypeScript code of the HomeComponent.
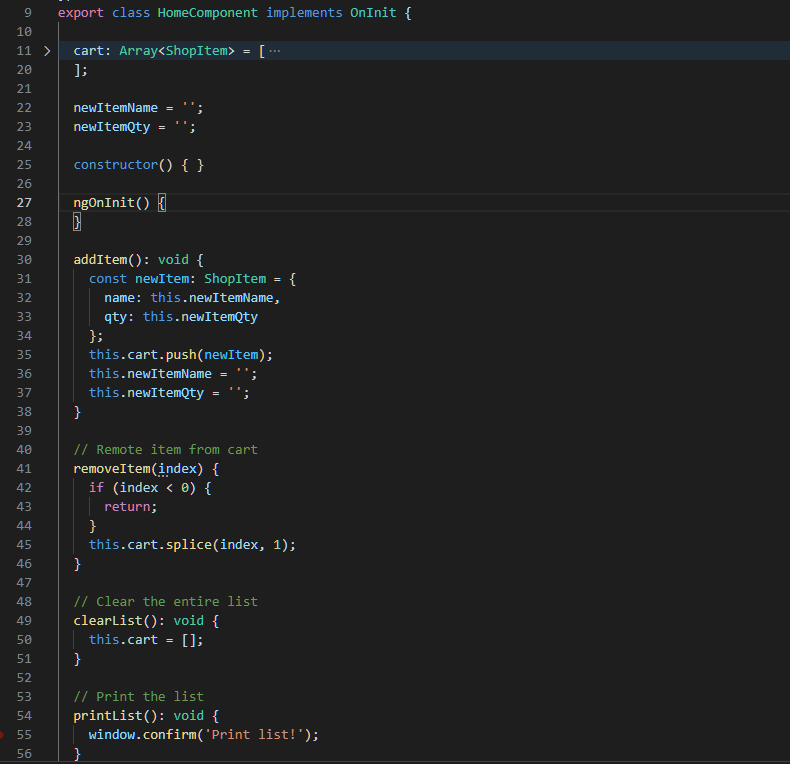
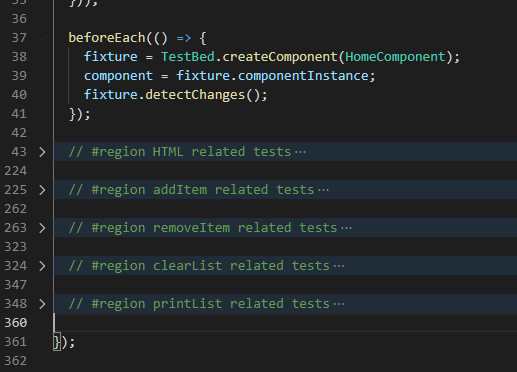
In TypeScript testing, we can group our tests by functions they are associated with.
Let’s take a look at the addItem function specifically to demonstrate how TypeScript unit tests can be written.
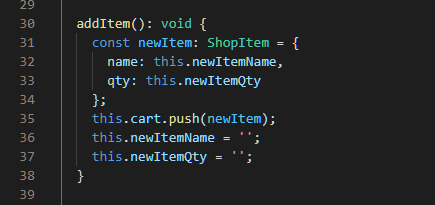
When the addItem is called, there are mainly two actions performed:
- A new item with value from newItemName and newItemQty is push to the cart array
- newItemName and newItemQty are cleared
We can write unit tests for each action.
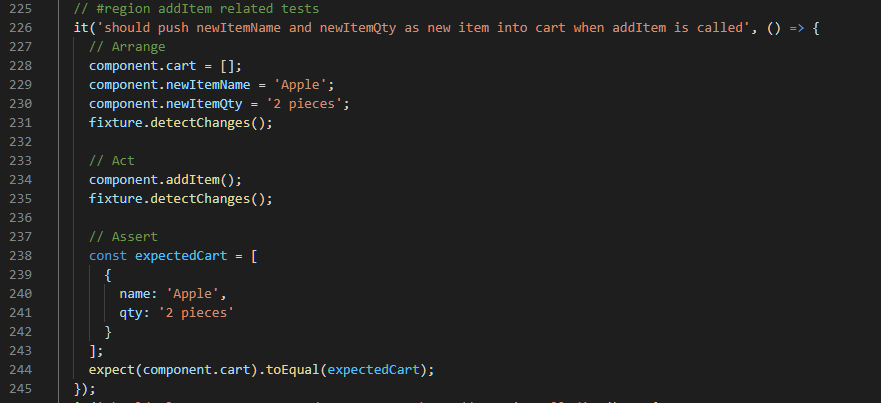

A key point to keep in mind while writing unit tests for TypeScript code is that you want to make sure all paths in your function are covered in your unit tests. If your function for instance has an if statement, then you should at least write two unit tests to test both cases when the if statement is reached and when it’s not.
Test RelationShip between HTML and TypeScript
In a component, often there are different ways of how its HTML can link with its ts file. We want to make sure the relationships are covered in our unit tests as well.
Event Binding
When it comes to event binding, you want to make sure the corresponding event is called when an event emits.
For instance:
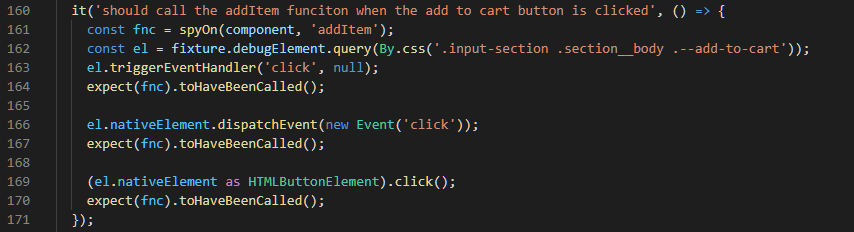
In this example, we create a Spy instance on the addItem method, and check if the function will be called when the button emits the click event.
Angular directives testings
Angular directives are very common in Angular applications. Let’s take a look at the two most commonly used directives in this section: ngFor and ngif.
NgIf
NgIf will hide/show HTML elements on the DOM. When an element is hidden by ngIf, instead of hiding it through CSS, Angular will actually remove it from the DOM element completely. This in the end actually makes it easier to test. To test if an element is hidden/shown by ngIf, we simply need to test if we can query the element successfully or not.
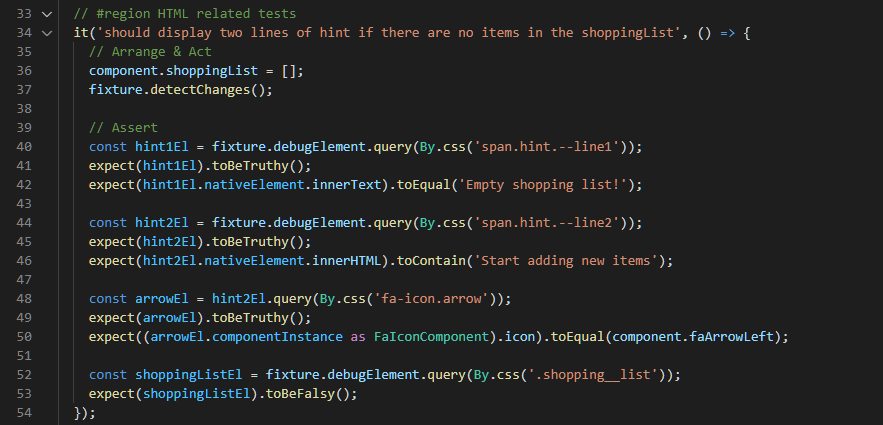
For instance, in the ShoppingListComponent, we will show empty messages when there are no items in the shoppingList input.
In order to test if the empty messages are shown correctly when there are no items in the shoppingList, we have prepared the following test case.
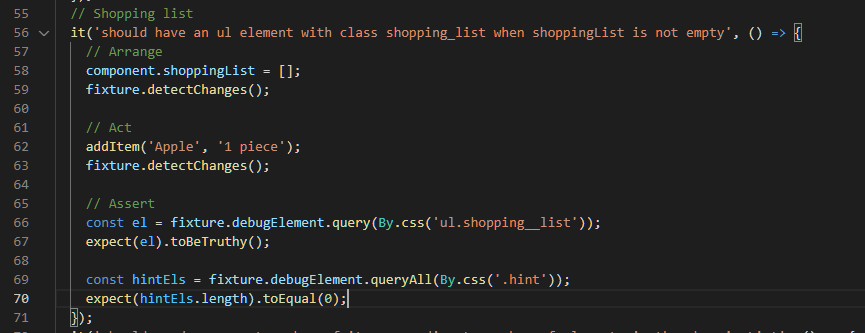
In the contrast, we can test if the shopping-list are displayed correctly like the following example:
NgFor
NgFor directives allow us to quickly create repetitive elements on the HTML. In the ShoppingListComponent, we want to create shopping items on the HTML according to the elements specified in the shoppingList variable. We can test this behaviour as the following example:
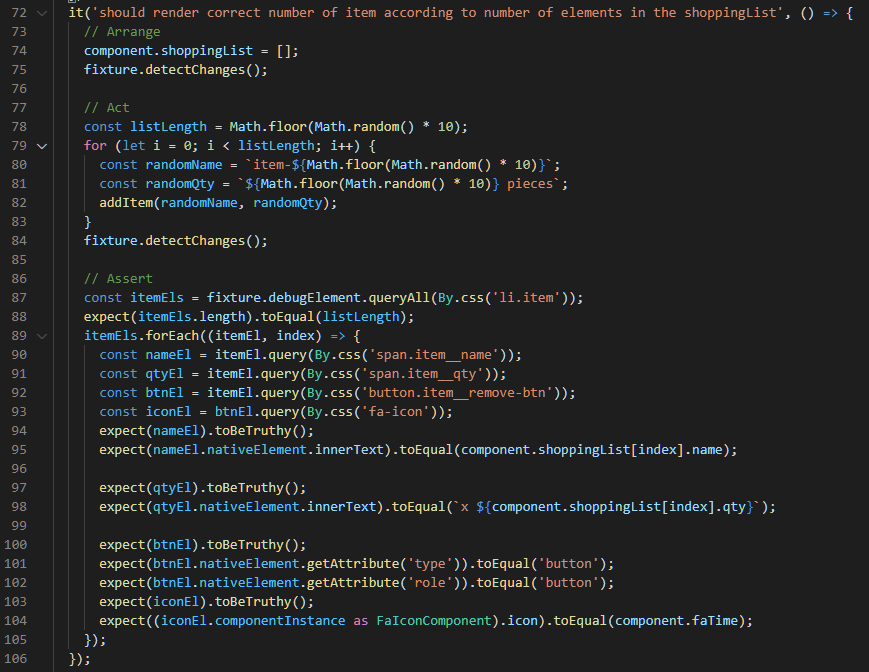
In this test case, we push a random number of elements into the shoppingList array and test if there are the correct number of elements rendered on the HTML. In addition, we use forEach loop to check if each element displays its content correctly.
Note. on line 90 to line 93, instead of querying from the fixture.debugElement, we query from the itemEl that we already fetched before. This kind of query will perform search from within the scope of the item element. This approach is especially useful when you want to test if the element you are looking for is the child element of a HTML element.
Communication between Parent Component and Child Component
In our demo application, we have the HomeComponent (as the Parent Component) communicates back and forth with the ShoppingListComponent (the Child Component). In Angular development, this is quite common. We’ll demonstrate how you may test if their communications are working correctly in this section.
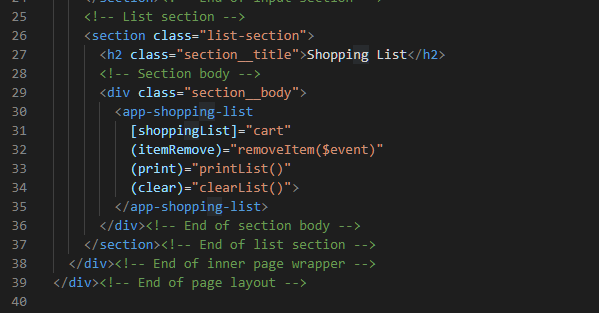
Parent component and Child component are communicated through the @Input and @Output directives. The HomeComponent passes the cart variable as the shoppingList input to the ShoppingListComponent and receives the itemRemove, print, and clear output events from the ShoppingListComponent.
Input Testings
In the following test case, we add an item to the cart array in the HomeComponent (line 192 to line 199). Then we compare it with the shoppingList variable from the componentInstance of the ShoppingListComponent directly (line 191 and line 200).
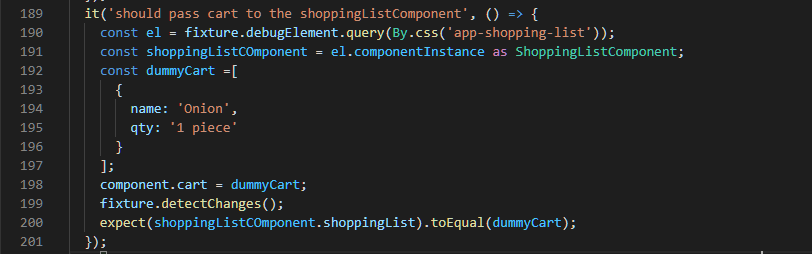
In Angular tests, componentInstance works the same way as the component instance. It allows us to access the variables or functions defined in the component. In this test case, we first query the ShoppingListComponent from the HTML using its HTML selector, then we access the shoppingList Input of the ShoppingListComponent directly from the componentInstance.
Output Testings
Often when a Child component emits an event from its outputs, we will execute a function from the Parent component. We can test this behaviour in the following test cases.
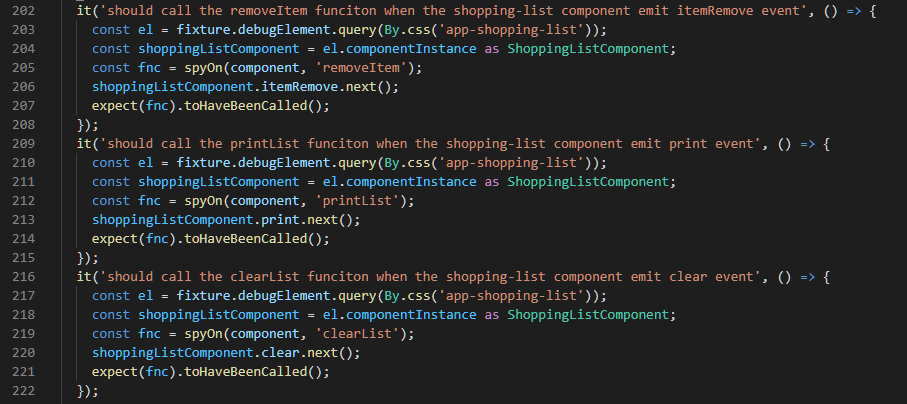
In these three test cases above, we first set a Spy object on the parent functions that we want to execute when the child emits events (line 205, line 212, and line 219).
Then we query the ShoppingListComponent using its HTML selector (line 203, line 210, and line 217).
Finally, we emit the events manually by accessing them through the componentInstance of the ShoppingListComponent (line 206, line 213, and line 220) and test if our Spies are called.
Conclusion
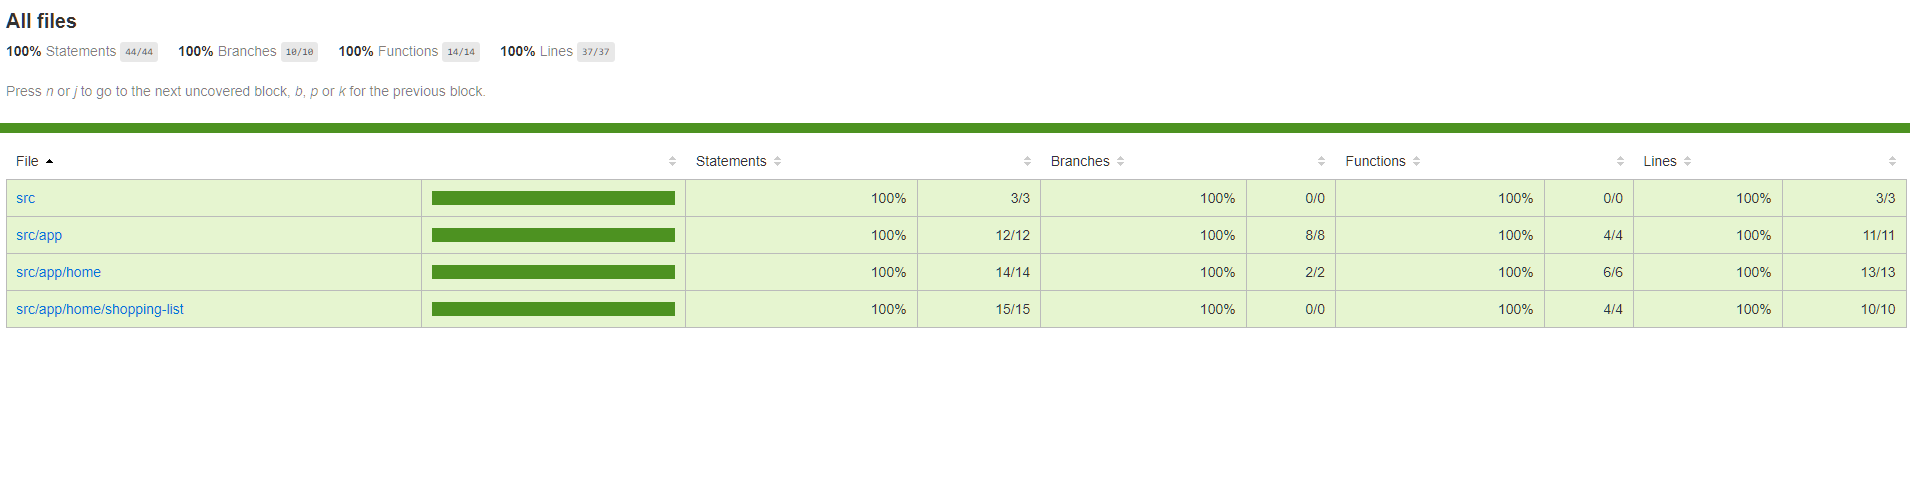
In this tutorial, we have covered many topics when writing unit tests for Angular Components. Although it’s quite difficult to go through all test cases for this shopping list demo application, we have covered most scenarios you need to learn in order to write unit tests for Angular Components. The complete code and its unit tests can be found on GitHub. You may find all test cases I have prepared for this demo application.
As you may have noticed, despite the fact that we have covered so many topics in this tutorial, we have left out the unit testing for Angular Form completely. That is because Angular Form testing consists of a good amount of topics that can form a tutorial on its own. In the next tutorial, we will look at how you can write unit tests for Angular Form.